 In the previous tutorial, we created a fake login page for facebook using Credential harevester.
This however, would work only over Local Area network. Today we will
enable port forwarding on our router and use our external IP address to
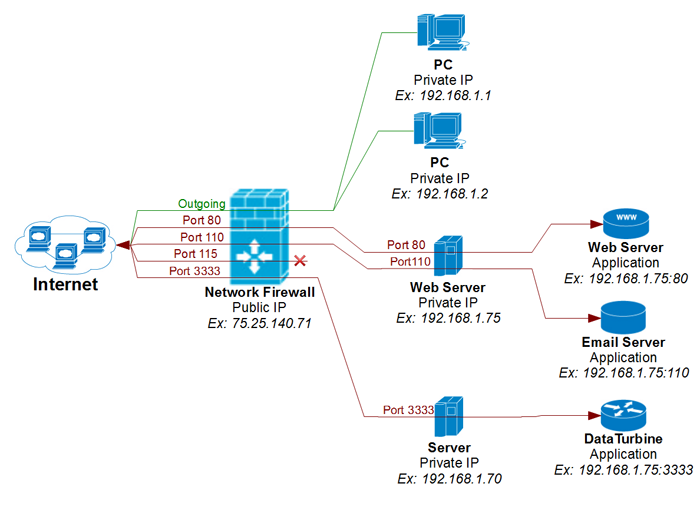
create a phishing page that will work over the internet. The picture
gives a good idea what port forwarding does. In the previous case, out
page was only visible to computers on the right side of the firewall,
i.e. those within the local network. The firewall handles traffic which
comes through public address and decides whether to forward it to the
internal network or block it. The port forwarding feature of the router
tells it to allow traffic through a certain port.
In the previous tutorial, we created a fake login page for facebook using Credential harevester.
This however, would work only over Local Area network. Today we will
enable port forwarding on our router and use our external IP address to
create a phishing page that will work over the internet. The picture
gives a good idea what port forwarding does. In the previous case, out
page was only visible to computers on the right side of the firewall,
i.e. those within the local network. The firewall handles traffic which
comes through public address and decides whether to forward it to the
internal network or block it. The port forwarding feature of the router
tells it to allow traffic through a certain port.Pre-requisites
- Must know how to use SET and Credential Harvester over local area network. If not read the tutorial on Credential Harvester (same as the link above).
- Kali Linux or backtrack 5 (other Linux distributions will work if you can install SET and all the dependencies)
- Patience - Finding your router password might be hard sometimes.
- Some basic knowledge (read a few old posts on this blog which I had written assuming that newbies were the ones reading. By now, after following dozens of my post, the readership has grown smart and doesn't need to be spoon fed.
Find you public IP
Go to google and
search what is my IP. Under normal circumstances you wouldn't even have
to click on any of the results, as google will find your IP for you. If
not, then one of the top results sure will.
 |
| I removed the address. But it will show up in your case. |
Finding your router IP and logging in
Most
of the times the IP is 192.168.1.1 or a slight variation, but do an
ifconfig to find out. Now enter the IP on your browser, and you'll see a
login prompt. Here is something that usually works-
- Username : admin
- Password : password, admin or in some cases, leave the password field blank
If none of the above combos work, try this http://www.routerpasswords.com/ or http://lmgtfy.com/?q=default+router+password
This
is the step where I can't help much. You need to see what your router
is and then find out the login details. Most of the times it is left to
default. You can also do a wordlist attack with common router login
credentials (help yourself, I am not going to write a thesis on this,
because many people have already done that, and you need to learn some
google-fu). Now after getting access to your router, come back to
Se-toolkit
Social Engineering Toolkit : Credential harvestor
Here is the set of commands that you will need. If you need the details check the previous post.
se-toolkit
1 (enter)
2 (enter)
3 (enter)
2 (enter)
Enter your public IP (first step remember)
Enter
the site you want to clone (The method works equally well with
Facebook, Gmail, Twitter or whatever. None of the steps will be
different at all for any website).
Now just let the terminal be and come back to your router.
The routers are all different : Port Forwarding
Now
here is another tough part of this tutorial. While the thing that needs
to be done is same for all routers, the procedure is not. You see, the
user-router interaction interface is different for all routers. The
thing you have to know is-
 |
| This is what my router looks like |
- Terms to look for - NAT, port forwarding, virtual servers (the router can refer to port forwarding by using any of these terms). If you find something like this, click on it. Also, many a times the routers interface is quite complicated and advanced, with seperate fields for WAN, LAN, access control, etc. You'll have to take a look around and see where you can find anything related to port forwarding. When you do, you can move to the step below.
- Stuff to enter-
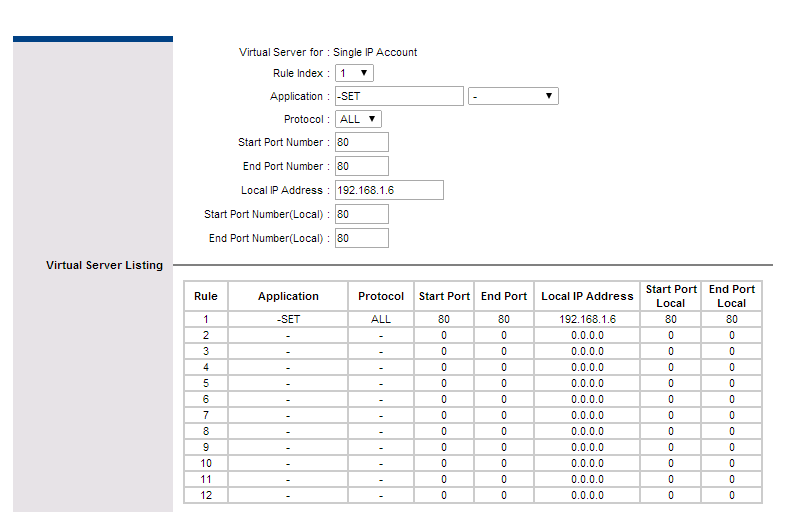
- Application name - Most routers ask you to give a name to the port forwarding setup. Many also have a drop down menu containing most common reasons why people perform port forwarding (the drop down menu mostly has multiplayer games and stuff, don't expect SET there). This field is insignificant, enter whatever you want to. Maybe SET.
- Port / First Port / Last Port - Some routers just ask you which port to forward, some ask you to enter a range. Nevertheless, you will enter either 80 as the only port, or 80 to 80 as the range. Any field which asks for anything related to port, and 80 is what you'll enter.
- Protocol (or some other name) - It will have options TCP, UDP, both (both may be replaced by all or TCP and UDP or something). Choose both or whatever corresponds to both in your router.
- IP address (sometimes not) - Here you enter your local IP. 192.168.1.xxx or something. Not your public IP.
Save
and you are good to go. If you have any field that you're not sure
about, mention it in the comments. It will help you as well as other
users who have the same difficulty. And here's how I set it up, look at
the screenshot and look for relevant fields in your router.


Go ahead
Now
open any browser and enter you IP. You will see your fake Facebook
login page there. Also, try and enter something in the fields. It will
show up on the Se-toolkit terminal. The screenshot on the right shows
what it looks like on my browser (Somehow se-toolkit decided to clone
the Hindi version of the website. I don't have any memory of ever using
Facebook in Hindi though).


After I entered data in the fields and pressing the login button, the following showed up on my se-toolkit window.
Make it look real-
Now
there are very few who will enter their login details to a website
whose name is not even a name, but a set of numbers seperated by dots.
You can use bit.ly or goo.gl to for that. However, they don't mask the
url, and as soon as the user reaches the destination, he will see the
original URL. I would have recommended dot tk, but they don't support IP
addresses. In this case, you can use no-ip, which will solve a lot of
problems-
- You'll get a static IP
- You'll get a comparitively less suspicious domain name
- You will be safer. This is because sharing your public IP address on the internet isn't a good idea. And with a port open, people (by people I mean professional hacker who know what they are doing) might break into your system. (If you noticed I never mentioned my public IP anywhere in the post, nor posted any screenshot with it. All the visitors to my site are hackers, and some are better than me, so I'm not inviting trouble here).
Alternatively, you can take a look here at http://www.pc-help.org/obscure.htm.
This page deals with the art of modifying your URL to fool others. In
our case, we will use it to make our IP address look like a legitimate
website. The only problem is some of the stuff is not browser
independent and would work only on a few browsers (each browser deals
with a URL differently).